Pattern Play: Creative Ideas for Tiling Patterns to Add Visual Interest to Your Space

Transform your space into an artistic canvas with creative tiling patterns. Tiles are not just for functionality; they can be a form of art, adding colour, texture, and pattern to any room. We explore innovative ideas for tiling patterns that can add visual interest to your space. Creating visually interesting spaces with tiles can transform any room into a work of art. Here’s how to infuse creativity into your tiling projects:

Herringbone Pattern

This classic layout, where rectangular tiles are arranged in a zigzag pattern, adds sophistication and dynamic movement to floors and walls. It’s ideal for creating a focal point in kitchens or bathrooms. Ideal for floors and walls, this classic pattern creates a focal point in kitchens and bathrooms, adding an element of visual interest that captivates the eye. The interlocking arrangement of rectangular tiles in a herringbone design not only enhances the aesthetic appeal but also lends a sense of structure and elegance to the space.

Chevron Pattern

Similar to the herringbone, the chevron pattern features tiles that meet at perfect points to create a seamless V-shape. This continuous line draws the eye along its path, perfect for elongating small spaces and adding a touch of sleekness. The chevron pattern offers a modern twist on traditional tiling, providing a linear aesthetic that can make spaces appear more expansive and orderly. A tiling course can offer valuable insights into achieving the precision required for this striking pattern.

Basket Weave Pattern

Emulating the intricacy of a woven basket, the basket weave pattern interlocks rectangular tiles to create a captivating, textured look. This design adds depth and a tactile quality to the floor or wall, evoking a vintage or artisanal feel. Especially effective in entryways or bathrooms, the basket weave pattern introduces an element of rustic charm and complexity to the tiling layout.

Hexagon Tiles

Hexagonal tiles offer a modern and geometric approach to tiling, creating a honeycomb-like effect that is both eye-catching and contemporary. These tiles fit together seamlessly, providing a unique pattern that can be adapted to fit both large areas and smaller spaces like backsplashes. The versatility and modern appeal of hexagon tiles make them a popular choice for those looking to introduce a distinctive geometric element into their design.

Mosaic Tiles

Mosaic tiles, known for their small size and colourful possibilities, allow for the creation of intricate patterns and scenes. These tiles can add a personal touch and artistic flair to any room, perfect for customising shower walls, kitchen backsplashes, or creating decorative borders. The flexibility in colour and design of mosaic tiles enables endless possibilities for personalization and artistic expression in tiling projects.

Subway Tiles in New Layouts

While subway tiles are traditionally laid in a horizontal brick pattern, experimenting with new layouts like vertical stacks, crosshatch patterns, or even a herringbone layout can modernise the classic look. To master these innovative layouts, searching for “https://www.tiling-courses.co.uk/ can be a great way to find local workshops or classes that teach the skills needed to execute these contemporary designs effectively. This versatility allows for a fresh take on a beloved tile style, providing the opportunity to create a unique and contemporary space.

Mixed Materials

Incorporating different tile materials, such as ceramic with glass or stone with metal, adds contrast and interest to your design. This approach can help delineate spaces within a room or add an eclectic, multi-textured touch. Mixed materials in tiling can elevate the design by introducing varied textures, colours, and finishes, creating a rich and dynamic visual experience.

Colour Gradation

Using tiles in varying shades of the same colour to create a gradient effect can introduce a serene and calming atmosphere to your space. This technique is particularly effective in bathrooms and kitchens, where a subtle transition of colour can produce a soothing and harmonious aesthetic. The gradation of colour can also enhance the perception of space, making it feel more open and airy.
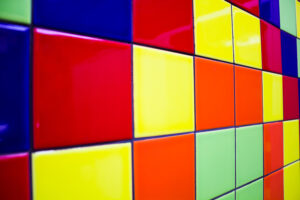
Geometric Patterns

Bold geometric patterns, achieved through shaped tiles or coloured tile layouts, can transform a floor or wall into a striking statement piece. These patterns are especially suited to contemporary spaces, where strong lines and shapes can create a dramatic and impactful visual statement. Geometric tiling offers a dynamic and bold approach to design, turning ordinary spaces into modern masterpieces.

Large Format Tiles

Using large format tiles can make a small space appear larger and minimize the visual interruption of grout lines, resulting in a sleek and modern look. These tiles, suitable for both walls and floors, can create a dramatic effect, offering a clean and expansive feel to the room. Large format tiles present a minimalist and elegant solution for contemporary spaces, emphasising simplicity and spaciousness.
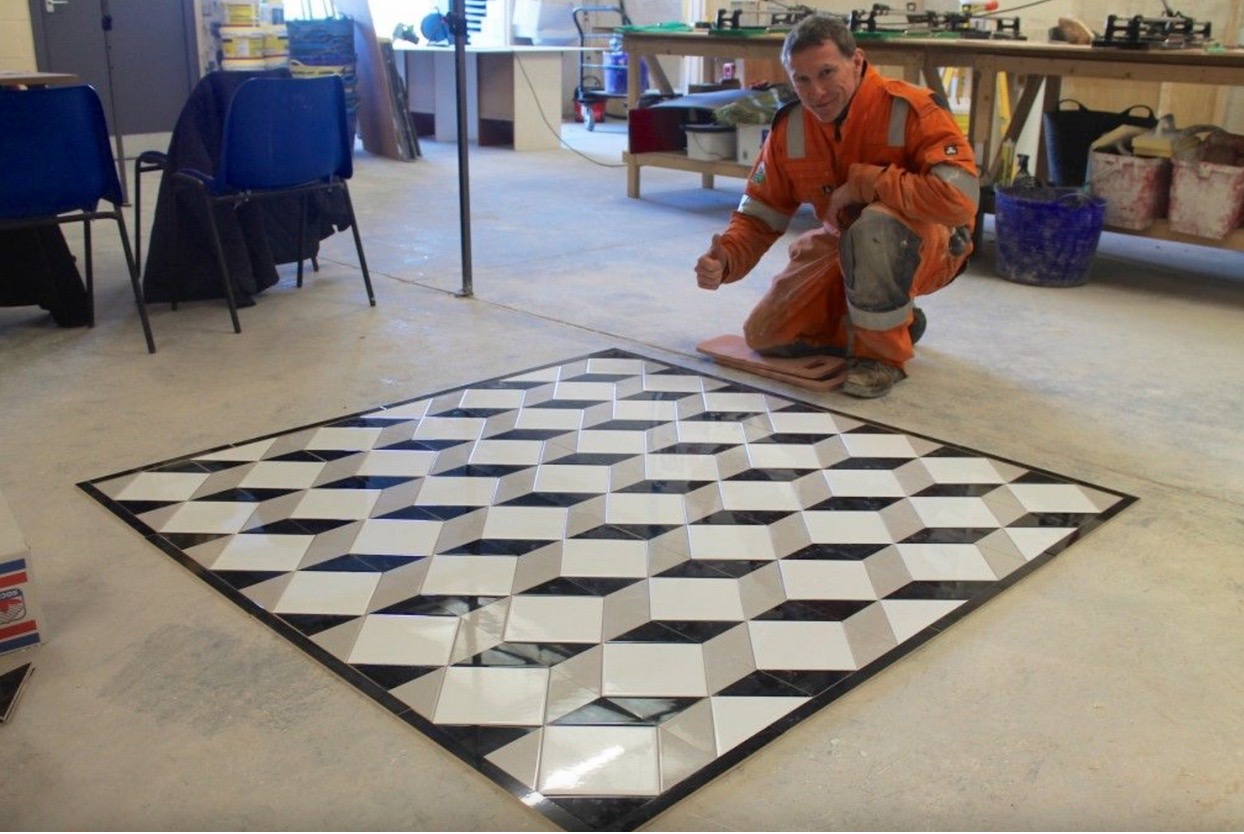
3D Tiles

Tiles with raised, embossed, or sculptural designs add a tactile element to spaces, creating a unique visual and textural experience. These 3D tiles can bring depth and dimension to a surface, making it not only a visual focal point but also an interactive feature that invites touch and exploration.

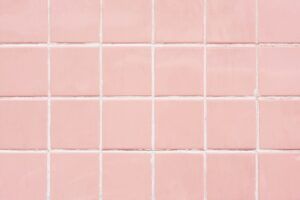
Monochromatic vs. Bold Patterns

Choosing a monochromatic tile scheme can create a subtle, sophisticated backdrop, enhancing the room’s overall calm and elegance. Conversely, opting for bold, contrasting colours and patterns can inject energy and vibrancy into a space, making it lively and dynamic. This choice allows for personal expression and can dramatically alter the room’s mood and perceived size, with monochromatic schemes offering a timeless elegance and bold patterns delivering a striking visual impact.

Tile Rugs

Create ‘rugs’ or ‘runners’ with tiles on floors to define spaces, add colour, or introduce patterns without the need for actual rugs. This approach is particularly beneficial in high-traffic or wet areas where traditional rugs would wear quickly or pose a risk for mould and dampness. Tile rugs can also anchor furniture groupings, add warmth to a room, and offer an opportunity to incorporate decorative elements into the flooring design.

Accent Walls

An accent wall with a striking tile pattern or colour can transform a room from simple to stunning, making a bold statement and serving as the centrepiece of the room. This design element can draw attention, create a focal point, and add depth to the space. Accent walls can also be used to experiment with bolder colours or patterns that might be overwhelming if used throughout the entire room, allowing for a creative and impactful design feature.

Mix and Match

Don’t be afraid to mix patterns and sizes to create a custom look. A blend of large and small tiles in different patterns can add a unique character to your space, breaking the monotony and injecting a playful element into the design. This approach allows for a personalized space that reflects individual style, with the juxtaposition of different tile designs creating a dynamic and cohesive look. Mixing and matching tiles can also optimize the visual interest and texture of the space, making it distinctly yours.

By exploring these creative ideas for tiling patterns, you can add visual interest and personality to your space, making it uniquely yours. Whether you’re aiming for a subtle enhancement or a dramatic transformation, the right tile pattern can significantly impact the look and feel of your room.


Revamping Outdoor Spaces Through Creative Uses of Tiles in Gardens

Outdoor spaces are an extension of our homes, offering a haven where we can unwind, entertain, and connect with nature. To transform these spaces into visually stunning and functional areas, homeowners are increasingly turning to creative design elements. One such versatile and aesthetically pleasing option is the use of tiles. Traditionally associated with indoor spaces, tiles are now making a bold statement in gardens. In this blog, we’ll explore the innovative ways in which tiles can revamp outdoor spaces, bringing a touch of elegance and sophistication to gardens.

  • Durable and Weather-Resistant Tiles

The first consideration when revamping outdoor spaces is the choice of materials. Tiles specifically designed for outdoor use are essential to ensure durability and resistance to weather elements. Opt for high-quality ceramic, porcelain, or natural stone tiles that can withstand varying temperatures, rain, and UV exposure. This sets the foundation for a long-lasting and low-maintenance outdoor design.

  • Creating Distinct Zones with Tile Patterns

Tiles are excellent for delineating different zones within your garden. Use contrasting tile patterns to define areas for dining, lounging, or gardening. For example, a geometric pattern could mark the dining area, while a more organic and flowing pattern can enhance the relaxation space. This creates visual interest and organises the outdoor space into functional segments.

  • Mosaic Magic

Mosaic tiles add a touch of artistry to outdoor spaces. They come in various colours, sizes, and materials, allowing for endless creative possibilities. Consider using mosaic tiles to craft intricate pathways, accent walls, or decorative borders around flower beds. Mosaics inject a burst of colour and personality into the garden, turning it into a personalised haven.

  • Statement Tile Walls

Elevate your garden’s aesthetics by incorporating statement tile walls. Choose a focal point, such as an outdoor fireplace, water feature, or seating area, and adorn it with eye-catching tiles. This not only adds a luxurious touch but also serves as a unique backdrop for your outdoor activities. The right outdoor tiles  can transform a simple garden into a visually stunning retreat.

  • Versatile Outdoor Flooring

Tiles are not limited to traditional uses; they can also be employed as innovative outdoor flooring solutions. Large format tiles can create a seamless and sleek surface for patios and decks. These tiles are easy to clean, resistant to stains, and provide a smooth, comfortable surface for outdoor furniture.

  • Natural Stone Elegance

Natural stone tiles are a great choice for a timeless appearance. Options like slate, travertine, or limestone add a touch of rustic charm to outdoor spaces. Natural stone tiles are known for their durability and ability to blend seamlessly with the natural surroundings, creating a harmonious and visually appealing garden landscape.

  • Poolside Luxury with Tiles

Extend the beauty of tiles to your pool area for a touch of luxury. Non-slip mosaic tiles or large format tiles are ideal for poolside spaces, providing both safety and style. Choose cool, soothing colours to create a serene ambiance around the pool, turning it into a retreat for relaxation and entertainment.

  • Vertical Gardens with Tile Accents

Combine the beauty of greenery with the elegance of tiles by creating vertical gardens with tile accents. Use tiles as a backdrop for climbing plants or incorporate them into the design of planters and trellises. This fusion of natural and man-made elements adds depth and character to the garden, making it a true outdoor oasis.

  • Alfresco Dining with Tiled Tabletops

Enhance your outdoor dining experience by incorporating tiled tabletops. Choose weather-resistant tiles in patterns that complement your overall garden theme. Tiled tables not only add a touch of sophistication but also provide a practical and easy-to-maintain surface for dining and entertaining guests.

  • Artistic Tile Installations

Transform your garden into an outdoor art gallery by incorporating artistic tile installations. Consider mosaic murals, stepping stones with painted designs or tiled sculptures strategically placed throughout the space. These unique elements become conversation starters and add a touch of personality to your garden.

  • Low-Maintenance Elegance

One of the significant advantages of using tiles in outdoor spaces is their low-maintenance nature. Unlike traditional landscaping materials, tiles require minimal upkeep. Sweeping and washing occasionally are usually enough to keep them looking fresh and clean. This makes tiles an attractive option for those who want a beautiful garden without the hassle of constant maintenance.

  • Reflective Surfaces with Mirrored Tiles

Add a touch of glamour and playfulness to your garden by incorporating mirrored tiles. These reflective surfaces create the illusion of more space and add a whimsical touch to the surroundings. Consider using mirrored tiles as accents in strategic locations, such as on garden walls or as part of decorative elements.

  • Contemporary Garden Edging

Tiles can be used creatively as garden edging to define borders and pathways. Choose tiles that complement the overall design of your garden and use them to create clean lines and boundaries. This not only adds a polished look to the outdoor space but also helps in maintaining a neat and organised garden layout.

  • Heat-Resistant Tiles for Fire Pits

For those chilly evenings, a fire pit becomes the focal point of outdoor gatherings. Use heat-resistant tiles to create a stunning and safe surround for your fire pit. These tiles withstand high temperatures and add a touch of sophistication to the warmth of the fire, creating a cosy and inviting atmosphere.

  • Innovative Tile Planters

Go beyond traditional planters by incorporating tiles into creative and innovative designs. Use tiles to clad planter boxes, creating a modern and stylish look. This not only serves a functional purpose but also adds a decorative element to the garden, turning planters into focal points crafted by professional tilers.

Revamping outdoor spaces with tiles opens up a world of creative possibilities. Whether you opt for the timeless elegance of natural stone, the artistic allure of mosaics, or the contemporary appeal of large format tiles, each choice contributes to transforming your garden into a personalised sanctuary. The versatility, durability, and aesthetic appeal of tiles make them an ideal choice for those looking to add a touch of sophistication and functionality to their outdoor spaces. So, let your imagination run wild, and embark on a journey to create an outdoor haven that seamlessly blends nature with the elegance of tiles.

Creating Visual Harmony with Tile and Grout Colour Combinations

Tiles are more than just functional elements; they are design statements that can transform spaces. Whether you’re renovating your kitchen, bathroom, or any other area in your home or business, the colour combinations you choose for your tiles and grout play a crucial role in creating visual harmony. This blog explores the art of combining tile and grout colours to enhance aesthetics, elevate design, and achieve a cohesive look in your living or working space.

The Impact of Colour in Design

Before delving into the specifics of tile and grout colour combinations, let’s understand the impact of colour on design. Colours evoke emotions, set moods, and influence perceptions. The right colour scheme can make a room feel cosy, spacious, vibrant, or serene. In contrast, a mismatched or clashing colour combination may disrupt the visual flow and create a sense of discord.

In the realm of tiles and grout, colour choices go beyond mere aesthetics. They contribute to the overall ambiance, influence the perceived size of a space, and define the style of a room. Whether you’re aiming for a contemporary, classic, rustic, or eclectic look, your choice of tile and grout colours plays a pivotal role in achieving your desired design outcome.

The Basics of Tile and Grout Colour Selection

  • Consider the Room’s Purpose

The function of the room should guide your colour choices. For example, soothing and neutral tones might be ideal for a bathroom where relaxation is key, while vibrant colours could inject energy into a kitchen.

  • Size Matters

Colour can visually alter the perception of space. Lighter colours tend to make a room feel more expansive, while darker tones can create a cosy and intimate atmosphere. Consider the size of the space and the effect you want to achieve.

  • Balance is Key

Strive for balance in your colour palette. If you opt for bold and colourful tiles, consider neutral grout to prevent the overall look from becoming overwhelming. Conversely, subtle tiles can be complemented by a more distinctive grout colour.

  • Factor in Light Conditions

Test your tile and grout samples in different lighting conditions to ensure they achieve the desired effect throughout the day.

Now that we’ve laid the foundation, let’s explore various tile and grout colour combinations that can create visual harmony in different spaces.

  • Monochromatic Elegance

Monochromatic schemes involve using varying shades of a single colour. For a timeless and elegant look, consider pairing white tiles with light grey or beige grout. This combination works well in bathrooms, kitchens, and living areas, providing a clean and sophisticated aesthetic.

Tip: Varying the tile finish, such as using glossy tiles with matte grout or vice versa, adds subtle depth to the monochromatic palette.

  • Contrasting Drama

Create a bold statement by opting for contrasting tile and grout colours. Dark tiles with light grout or vice versa can add drama and visual interest to a space. This approach effectively highlights specific areas, such as a backsplash in the kitchen or an accent wall in the bathroom.

Tip: Ensure that the contrasting colours complement rather than clash with the overall colour scheme of the room.

  • Neutral Serenity

Neutrals are timeless and versatile. Combine beige or grey tiles with matching grout for a serene and calming atmosphere. This neutral palette is suitable for various design styles, from modern to traditional, and provides a backdrop that allows other design elements to shine.

Tip: Experiment with different tile patterns, such as subway or herringbone, to add visual interest within a neutral colour scheme.

  • Earthly Warmth

Embrace the warmth of earthy tones by selecting tiles in shades of terracotta, brown, or muted greens. Pair them with a complementary grout colour to enhance the natural and cosy feel. This combination is particularly well-suited for rustic or Mediterranean-inspired interiors.

Tip: Matte-finish tiles with slightly darker grout can accentuate the earthy and natural aesthetic.

  • Cool Blues and Greens

For a refreshing and tranquil ambience, consider cool blue or green tiles paired with a matching grout. This combination is ideal for bathrooms or spaces where you want to evoke a sense of calm and relaxation. Lighter grout tones enhance the overall freshness of the colour scheme.

Tip: Incorporate natural elements like plants or wooden accents to complement the cool colour palette.

  • Modern Minimalism

Minimalist design often relies on a simple colour palette. Opt for large-format tiles in neutral tones, such as white or light grey, with a grout colour that closely matches the tile. This seamless look creates an illusion of expansiveness and contributes to the overall modern aesthetic.

Tip: Choose rectified tiles for a sleek and uniform appearance, where grout lines are minimal.

  • Playful Patterns

If you enjoy a bit of playfulness in your design, experiment with patterned tiles. Whether it’s geometric shapes, encaustic patterns, or vibrant motifs, let the tiles be the focal point. Pair them with a neutral grout that complements the predominant colours in the pattern.

Tip: Reserve bold patterns for specific areas to avoid overwhelming the entire space.

Tile and Grout Maintenance for Long-lasting Beauty

Once you’ve achieved the perfect tile and grout colour combination, maintaining their beauty is essential. Here are some tips for long-lasting vibrancy:

Regular Cleaning

Implement a regular cleaning routine to prevent dirt and grime build-up. Use a pH-neutral cleaner to avoid damaging the tiles or grout.

Grout Sealing

Periodically seal the grout to protect it from stains and moisture. This is especially crucial in high-traffic areas or spaces prone to spills, such as kitchens.

Prompt Stain Removal

Address spills and stains promptly to prevent them from becoming permanent. Different stains may require specific cleaning solutions, so be sure to identify the stain type before applying any remedies.

Avoid Harsh Cleaners

Steer clear of abrasive cleaners that can scratch tiles or erode grout. Stick to mild cleaning solutions and tools to preserve the integrity of your tile and grout surfaces.

Periodic Tile Inspection

Periodically inspect tiles for any signs of damage or wear. Cracked or chipped tiles should be replaced promptly to maintain the overall aesthetic.

Professional Maintenance

In cases where DIY efforts fall short, consider professional tile and grout cleaning services. Professionals have the expertise and tools to deep-clean and rejuvenate your tiled surfaces.

Conclusion: Bringing Your Vision to Life

Selecting the right tile and grout colour combinations is a journey of self-expression and creativity. Whether you opt for timeless neutrals, bold contrasts, or soothing blues, the key is to align your choices with the overall design vision for your space.

How To Install Mosaic Tiles

While mosaic tiles may be tricky to work with, they look fantastic when they’re applied.

Mosaic tiles tend to be supplied as sheets already fixed to a soft mesh backing. Ordinarily, these sheets are 300mm square, enabling large areas to be tiled without worrying about spacers between the individual mosaics.

 bathroom

When you first discover these sheets, you’ll probably breathe a huge sigh of relief! However, just because you don’t have to juggle thousands of mosaic tile pieces all the time, it doesn’t mean that installing mosaic tiles is always a simple task.

There are advantages and disadvantages to applying mosaic tiles both individually and on a backed sheet.

One downside to applying mosaic tiles using a backed sheet is that it can be challenging to apply even pressure across the whole sheet. The result could be that some tiles sink too deeply into the adhesive, whilst others are falling away.

Professional tilers will, no doubt, have accumulated methods of avoiding this issue, however, that is not to say all tilers (no matter what their experience) shouldn’t bear potential issues with mosaic tiling projects in mind.

Some tips for overcoming a sinking backed sheet (aside from having enormous, flat and extremely steady hands!) may be to invest in some rigid mesh backing sheets. These sheets are usually self-adhesive and applied straight to the back of the sheet of tiles. They can then be handled like a larger tile and will have a flat, professional look.

Putting some time into the preparation of the walls, starting with a completely flat surface will save a lot of work and time as you start to apply the mosaics.

If you are not used to working with mosaic tiles, don’t be daunted or put off!

Here are some exclusive tips for mosaic tiling:

  • Turn the sheets over to cut them – if sheets of tiles need trimming, turn them over and trim with a sharp utility knife.
  • Avoid cutting tiles – think ahead and spread the gaps, or squeeze them, to ensure a full mosaic tile fits the final gap.
  • Use professional equipment – if tiles do need cutting then aim to use the best cutter you can afford to buy or hire.
  • Clean as you go – adhesive lumps protruding through the grout spaces may end up being visible. As the adhesive starts to harden it is worth going over the gaps with an old toothbrush before grouting.
  • Go easy on the grout – with potentially hundreds of edges to be cleaned after grouting, it is worth taking more time grouting the mosaics than might be the case with larger tiles.

Mosaic tiles are commonly found used as a decorative feature, often breaking up a wall of plain tiles in a bathroom. When planning a bathroom or kitchen it might also be worth considering a mosaic splashback.

Above a sink, behind a cooking hob or kitchen worktop, a mosaic splashback can transform a room. As well as boosting the aesthetics of a home, mosaic tiles create a washable surface where water or food could stain a plain wall.

It’s not just walls that would benefit from mosaics. Consider adding a glamorous touch to the bathroom by tiling the shower floor with glass mosaic tiles. Whilst large glass tiles might be too slippery for floors, the network of grout lines on a mosaic floor will provide substantial grip.

A bathroom designer could create endless patterns with mosaics by laying them individually, maybe have a sea life scene on your shower floor.

The challenges of tiling with mosaics are almost certainly out weighed by the potential impact on your home’s charisma.

If you’d like to master your skills when it comes to tiling with mosaics, UK Pro Tiling Training can help.

How To Tile Around Windows

Tiling around a window is no easy task and that’s why it is a job most often left to a tiling professional.

After all, if mistakes are made it can be costly to put right and, ultimately, without paying significant attention to detail and doing a decent job, the end result can look terrible, leading to leaks, mould and cracks in the tile.

A tiling professional, however, is trained to tile around challenging points in the wall and can apply tiles around a window flawlessly so they look elegant and sophisticated, while offering water resistance and durability.

At UK Pro Tiling Training, we train our tiling students to tile any project with accuracy and efficiency. We, of course, instruct our students on how to tile around windows.

windows

Here’s our step-by-step guide for how to tile around windows.

Before starting the job

  • Plan the project!

Make sure you plan out the tiles and grout lines on the surrounding wall and window to make sure they all match up before applying any tiles.

  • Collect the tools and materials you need, making sure they are accessible
  • Tape measure
  • Wall spacer
  • Sponge
  • Felt tip pen
  • Mitre Block
  • Grout spreader
  • Adhesive spreader (Notched trowel)
  • Adhesive (suitable for the room)
  • Grout
  • Tiles
  • Tile nipper
  • Tile trim
  • Tile cutter
  • Gloves
  • Safety Goggles

Tiling around a window

Measure the depth of the recess up to the edge of the window.

  1. Measure each tile gap using the tile spaces.
  2. Cut the tiles to fit using a tile cutter, you can use a tile cutting machine or tile nipper.
  3. To finish the corner tiles, use a tile trim and cut at a 45 degree angle.
  4. Starting from the bottom, spread the adhesive and apply the tiles.
  5. Work up the sides and finish at the top.
  6. Use a wooden support structure to hold the tiles (specifically the top tiles) in place.
  7. Leave the adhesive to dry for 24 hours. Once dry, the tiles will be fixed in place.
  8. Apply the grout.
  9. Wipe the tiles clean with a damp sponge.

After applying the tiles

Once applying the tiles and the grout and all has dried, it is a good idea to spray the tiles around the window with grout protector spray. This will protect the tiles from any moisture, damp, mould and general wear and tear.

More advice from UK Pro Tiling Training

Learn more about tiling with UK Pro Tiling Training.

20 Bathroom Tile Patterns

Don’t be fooled into thinking that your bathroom tile patterns should be simple and plain (bland and boring…). There are huge variations of tiling options that can add a great zest of life to your bathroom.

Whether you are looking for tile ideas for small bathrooms or larger washrooms, take a look at the 20 Bathroom tile patterns below and open your mind to what tiles and tiling patterns may look good in your home.

  1. Natural stone tiles

Natural stone tiles are incredibly popular in contemporary homes for their neutral appearance and durable qualities.

Natural stone tiles can be bought in various sizes and can be used for walk-in showers too, something we teach in our natural stone tiling course.

  1. Rainbow coloured tiling pattern

If you want to add a little colour to your bathroom, why not opt for a multi-coloured tiling pattern?

Multi coloured tiles can be a good choice of colour for smaller bathrooms, and work particularly well to brighten up your additional toilet or shower room.

  1. Checkerboard tiling pattern

The checkerboard tiling pattern has been around for a number of years, however, has most recently been seen to be making a comeback!

Best installed by a professional tiler, the checkerboard tiling pattern offers a sleek and sophisticated finish.

  1. Laminate flooring

Laminate flooring is a safe bet for those on a budget as it is generally considered to be a cheaper bathroom floor option than tile.

While here at UK Pro Tiling Training we would always opt for tiles for their quality and long-lasting durability, we can understand the attraction to the lower initial cost that laminate provides.

  1. Marble tiles

Marble tiles most definitely have a luxurious edge that makes this type of tile stand out from the crowd.

Marble tiles work well in large bathrooms and kitchens.

  1. 3-layer tiling pattern

The 3-layer tiling pattern should be installed by a tiling professional and essentially features detailed ornamentation around the bath.

Another prestigious tiling pattern, the 3-layer tiling pattern can add a sense of supremity to your bathroom.

  1. Mosaic tiles

backgrounds-bathroom-blue-9082 (1)

Mosaic tiles are much smaller than standard tiles and can be applied in a straight-forward format, like in the image above, or can be applied in a more detailed, shaped design.

Professional tilers enjoy working with mosaic tiles as these tiles encourage creativity and variation.

  1. Chevron tiling pattern

The Chevron tiling pattern is a tiling pattern with a difference and will provide your bathroom with a retro feel.

The pattern will vary depending on the colours you choose. Bolder colours will result in a more obvious pattern.

  1. Porcelain tiles

Porcelain tiles are a type of ceramic tile and are incredibly popular for use in bathrooms and kitchens. The great thing about Porcelain tiles is the fact that they can be in a large format to fit in any size bathroom. Large porcelain tiles work exceptionally well for use on bathroom flooring.

  1. Straight lay tiling pattern

abstract-attractive-backdrop-8

The straight lay tiling pattern is the simplest tiling pattern of all, but it must be applied neatly to look chic and sophisticated.

The pattern consists of tiles (most often ceramic) applied in a straight horizontal pattern.

     11. Diagonal lay tiling pattern

The diagonal lay tiling pattern is similar to the tiling pattern above but, yes you guessed it, the tiles are applied on a diagonal slant.

      12.The Versailles pattern

The Versailles tiling pattern is a more complicated tiling pattern that looks effective in all areas of the home, including the bathroom, although is not recommended for very small bathrooms.

The Versailles pattern features four different tile sizes and, although, portrays a random look, requires meticulous planning. It is best installed by expert tilers.

   13. The basket weave tiling pattern

An intricate tiling pattern that portrays the weaved look, the basket weave pattern works well in bathrooms of all sizes.

   14. Herringbone tiling pattern

The Herringbone tiling pattern is another classic that can be complicated to apply and should be carried out by a professional tiler.

It is an excellent choice for making rooms look bigger and essentially consists of tiles, applied in V shapes by being placed at a 45-degree angle.

    15. Easy applicator tiles

Some tiling patterns are fused on larger tiles to make for an easier application, perfect for those looking to apply the tiles as a DIY task.

    16.The Brick Pattern

The brick pattern can make for another more retro bathroom wall tile design and is essentially made up of rectangular tiles applied in a brick wall format.

A good tiling pattern for smaller bathrooms or walls with an uneven surface, the slight misalignment of the tiles fools the eye into thinking the wall is bigger.

     17. The hexagon pattern

The hexagon pattern is made up of numerous hexagon shaped tiles applied to the wall or floor. It can be slightly more difficult to apply this shape of tile. Additionally, hexagon shaped tiles can be more difficult to come-by.

     18. Windmill tiling pattern

The windmill tiling pattern tends to be too busy a pattern for a whole wall or entire bathroom floor, however makes an affective border or feature area. It consists of four small rectangular tiles placed around a larger square tile. The windmill pattern is best applied by a professional tiler.

    19. English bond tiling pattern

The English bond tiling pattern consists of a combination of rectangular and square tiles applied in a horizontal format. This pattern makes a nice, yet similar, alternative to the brick tiling pattern.

     20. Vertical brick tiling pattern

The vertical brick tiling pattern is an alternative to the standard brick pattern and can be a popular option for contemporary homes.

White vertical brick offers the ultimate modern look for bathrooms.

More information on bathroom tile patterns from UK Pro Tiling Training

If you would like to expand your knowledge of tiling patterns with one of our professional tiling courses, then please do not hesitate to contact us at UK Pro Tiling Training.

Guide To Multi-Coloured Wall Tiles

20160927_181539-1 20160927_181539-1 hi web-pics-032 Kensington 20160927_181539-1 20160927_181539 20160927_181539 20160927_181539 img_5642 img_5642 tiles-career-2017 tiles-career-2017 20161201_113311 20161201_113311-1

Very nice new multi-colored tiles with a lot of colors

A home is a place of character, as well as function and, ultimately, there is nothing that makes a house more plentiful than colour.

Whether you usually opt for splashes of colour amongst the decor, block walls, bright wallpaper or opt for colour on all walls of the house, colour makes a big difference to a home and often defines a property’s overall style.

The impact that colour has on a property means that many home owners often think twice when it comes to choosing multi-coloured wall tiles. And with good reason.

After all, when you choose multi-coloured wall tiles, you need to consider what colours will suit your home, the tile pattern, the price of the project and how you”d like the tiles arranged.

That said, when thought about and planned properly, multi-coloured wall tiles make for a fantastic interior addition to a home. Therefore, here’s our guide to multi-coloured wall tiles:

What to consider before investing in multi-coloured wall tiles

Will multi-coloured wall tiles suit your project?

We”ve all seen those bathrooms that feature black and white tiles in a checkerboard pattern that simply look horrific in some properties. In others, however, this pattern of tile looks luxurious and sophisticated. This could be due to many reasons. Dark colours don’t always work well in a room that doesn’t receive enough natural sunlight, it may also be because it is too small or because it has an unusual shape for dark and/or patterned tiles. Essentially, there are many factors to consider before investing in your multi-coloured tiles.

You’ll need to think about:

  • The shape of your room and the area to be tiled
  • How much sunlight the room receives
  • The style of your property’s interior

How you will choose your colour

Some people out there will be lucky enough to have the means to ask an interior designer their views on colour, however, the rest of us out there will simply be equipped with a Dulux colour guide, the internet, a tester paint pot and sample tiles.

Therefore, a good way of considering colour is referring to a colour wheel. This can help compare colours and help you choose colours more precisely. Essentially, you’ll find different shades of the colours you are looking for and match accordingly.

Will you DIY or invest in a professional tiler?

There is something much more impressive and accurate about have professionally installed tiles, when the job is completed by a well-trained tiler. What’s more, when it comes to multi-coloured tiles you”d benefit from the knowledge of a professional tiler when it comes to laying the tiles in a pattern. Although you may have a strict budget, employing a professional tiler can help you save money on the initial cost of the tiles (as they may have a trade account with a tile dealer) and can also minimise the amount of excess tiles.

If you are doing a DIY tiling job, however, feel free to browse our guides for help when installing your tiles. As we”ve said, however, it is particularly recommended that multi-coloured tiles are laid by a professional tiler for accuracy, precision and an excellent finish.

How will the tiles be arranged?

There are many tiling patterns you may wish to choose from when it comes to installing your multi-coloured tiles. You may choose to accentuate certain features of a room, or choose a mirror-image pattern style.

You may want to refer to our guide to installing multi-coloured kitchen tiles or our guide to common tiling patterns for some more inspiration!

What All Tilers Should Know About Wood Effect Tiles

Close up of wood-like floor tile. Ceramic tile with wooden structure in close up - useful background.

Wooden floors are a popular choice amongst many homeowners, often chosen instead of carpet for their sophisticated appearance and ease of cleaning. Wooden floors are effective in modern homes with a contemporary interior, as well as more traditional interiors.

What’s more, the up and coming trend for interior flooring is wood-effect tiles. Favoured for their elegant appearance and ease of maintenance, floor tiles that look like laminate flooring planks are setting a new interior property style that everybody is after. As a result, these wood effect floor tiles are a big thing at the moment in the tiling world and if you”re not aware of them as a tiler, you”re missing a trick.

In fact, these wood effect tiles are really exciting and allow tilers to work on projects in the home beyond the realms of the kitchen and bathroom. After all, some people would like wood effect tiles throughout the whole downstairs of the house, while others choose them for the lounge, bedrooms, conservatories and more.

So, how do you lay wood effect tiles and what variations can we expect to see in this up and coming range of tiles?

Variations of wood effect tiles

Wood tiles come in various types of wood and tiling styles. Long floor tiles are a particularly favoured style of wood tile, due to the fact they leave a chic and sophisticated look, as well as being simple to install. Essentially, wood effect long floor tiles are popular for their practicality and how close they are to real wood floor.

Choose from a range of wood types: Oak, ebony and pine, to name just a few. What’s more, you can choose from different shades of woods and colours, which can again, enhance the type of tiling pattern you opt for.

Of course, more intricate tiling patterns will require smaller wood effect tiles, however, many people favour the long floor tiles to be as similar as possible to genuine wood floor.

How to lay wood effect tiles

There are various wood effect tiling styles, all of which have something different to offer in terms of their overall look. Take a look at just a few of the tiling patterns possible with wood effect tiles.

Brick

Often the favourite tiling style in properties where the owner would like a wider-looking floor, opting for long wood effect floor tiles and having them laid in a brick pattern is a sure-fire way to a make a room look more spacious and is ideal for open plan areas.

Herringbone

The Herringbone pattern is an intricate tiling pattern that consists of rectangular tiles positioned in a parallel line at a 45-degree angle, the pattern then features another row of tiles lined up in a mirror image next to them.

Random

Many customers may choose a random pattern to go with the shape of their room, or may have a preference of how they would like the wood floor tiles placed.

More information from UK Pro Tiling Training

We will, of course, cover long floor tiles in our advanced courses at UK Pro Tiling Training. However, if you are a past student or would like some more information about this up and coming trend, please do not hesitate to contact us, we”re happy to help!