Month: June 2016

Tiling Over A Bath

Tiling over a bath

When undertaking tiling work in a bathroom it is at some point where you will be tiling over the bath or shower tray.

This can lead to problems if not done correctly as water can leak where the tile meets the bath if the job is not done correctly and siliconed well even more so if the bath has a shower above it.

Fill the Bath DSCF3193

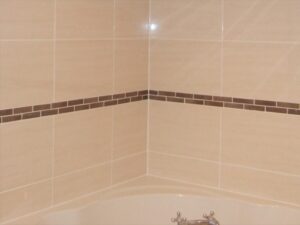
The first thing you should do is fill the bath with water, about a quarter of a tonne of water is produced when the bath is filled, this causes the bath to sink about 2 mm, if your tiles have been placed directly on top of the bath and then siliconed, the 2mm drop will cause the silicone to split resulting in water being able to get down behind the bath causing damage to the walls and floorboards.

Method

Filling the bath and leave a 2mm joint between the bath and tile then using your silicone gun, apply the silicone to this joint filling the void and leave the bath water in for a minimum of 12 hours to let the silicone cure, once this is done let the water out of the bath and you will have a much better seal than the last method.

Shower Trays

A shower tray cannot be filled with water so just leave the 2mm gap and silicone, this way the silicone will fill the void between the tile and tray, therefore, making the seal.
Finish the silicone off with a profile tool to create a neat finish.

UK Pro Tiling Training, fast track professional tiling courses, change your career with our help.

Visit www.tiling-courses.co.uk for more info.

Can You Tile on Tile

Can you Tile on top of existing tiles?

Many bathrooms are already tiled and the big question is do I need to take off the existing tiles or can I tile straight on top of the old ones. gopt-2 (1)

Well the answer is yes and no

There are adhesives on the market that will certainly stick to the existing tiles but that is not the only thing you have to consider.

Surface

The original tiles will be stuck to the background substrate but what is it, the problem with tiling on top of tiles is you don’t know what the original surface is.

Weights

If the original surface is made of plasterboard then this will have a weight ratio of 32kg/ mt2 which is ideal for holding two sets of tiles, however if the plasterboard has been skimmed with plaster, this will reduce the weight ratio down to 20kg/ mt2 which is not enough for two sets of tiles and therefore failure can happen.

Who has fixed them before?

Another problem with tiling on tile your tiles are only as strong as the last persons fixing.
If the last person who has fixed the tiles has used incorrect methods and the tiles are not fully bonded, the weight of your new tiles can pull the last tiles off the wall resulting in failure.

What is the condition of the surface?

With tile already being on the wall you have no idea what the condition of the surface is like, is there damp or cracks in the wall, both of these can lead to tile failure.

Depth problems

Around your doors you will have an architrave, when using one set of tiles this still looks good as the architrave will still sit proud of the set of tiles, once you load up with another set of tiles, the new set becomes flush with this architrave and looks terrible.

For safety and a good looking finish, it is best to remove all existing tiles from the wall, do a survey of what the state of the wall is and prepare it correctly, by doing this you are dramatically reducing the risk of failure.

Tiling Training
By having the correct training by attending a tiling course you can do all your DIY projects with confidence.

UK Pro Tiling Training run fast track professional tiling courses which teach you all the correct methods of how to do the job correctly.
To get in touch visit our website www.tiling-courses.co.uk

Can You Tile Direct on Top of Wood

Can you tile onto a timber floor

Timber floors are one of the most common surfaces found in the home and a lot of people wish to have this kind of floor tiled.

Unknown
Can you do it?

Timber tongue and grooved floor boards weyrock and chipboard are all types of timber floor. All of these wood surfaces will have some kind of movement due to them not being fixed properly or due to expansion and contraction which comes from atmospheric temperature changes.

This will certainly cause problems when tile is placed on the top, usually resulting in tile failure.

First thing to do is to reinforce the floor, this can be done by overlaying sheets of plywood, British standards recommend 15mm ply to be used but 12mm is more commonly used. The plywood overlay needs to be screwed down at least every 300mm centres, what this will do is stop any bounce making the floor more stable, however you will still have the lateral movement due to expansion.

When applying more than one sheet of ply to the floor, make sure that you leave a 2mm gap between the boards.

Cement Adhesives

It is strongly advised to use a cement based adhesive, one that has a flexible images-4
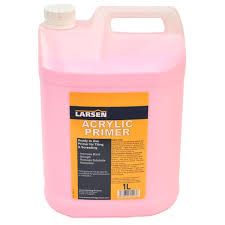
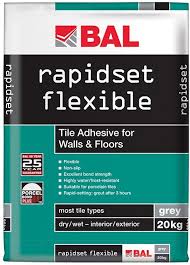
property to it by adding a latex additive or buying a SPF (Single Part Flexible)

A better way of securing a wood floor would be to use cement board instead of a plywood sheet.

Hardibackker, Wedi or No More Ply are better options as 6mm cement board can be applied to strengthen the floor and the cement board does not have the same expansion problems the ply would have.

Once the cement board has been secured to the floor the floor can then be tiled with less possible problems arising.

UK Pro Tiling Training offer fast track hands on professional tiling courses and cover all the background preparation procedures in detail.

For more info visit our website www.tiling-courses.co.uk

Tiling With Large Tiles

Tiling with large format tiles

Tiles are getting bigger and bigger and can range up to 2 metres square however this is a bit too large for the average customers house.

A very common size now is 600mm x 600mm or 600mm x 300mm

A big mistake many people make when tiling with this size tile is in the adhesive selection, popping down to your local DIY store and getting some ready mixed tub adhesive is not the answer when fitting this size of tile.

Ready mixed tub adhesive cures through water loss and this water escapes through the joints of the tile or through the background, the size of large format tiles can stop this from happening.

Tub adhesives can take up to 5 days for the water to escape, again this length of drying time can cause problems and failure in large format tiles.

Porcelain tiles are even worse; they have extremely low porosity, which stops the adhesive loosing water.

The correct answer for fitting large format tiles is by using powdered cements adhesives which are poly modified, they cure much faster than ready mixed dispersion adhesives , cement adhesive dry with a chemical reaction and is therefore a stronger more safer adhesive to use than ready mixed tub adhesive.

When using cement adhesive always make sure the substrate surface is primed with a good acrylic or SBR primer, this can stop any chemical reactions going on between the adhesive and background which can cause tile failure.

Always make sure the substrate surface can hold the weight of the tile you are using, a plaster skim surface will hold 20kg / m2 where as a plaster board surface will hold 32kg / m2.

Correct training on a good tiling course will ensure that all the above methods are used. UK Pro Tiling Training offer fast track professional tiling courses which cover all aspects of correct tiling methods

Visit www.tiling-courses.co.uk to find out more.

Cracking Grout

Cracking grout problems in your tiling workgrout

After you have done a great job tiling your projects, you may find out that the grout has cracked the next day, this is quite a common problem and there can be many reasons why this is happening

Here are a few reasons why grout cracks

1. The grout joint is too wide, as the grout dries it shrinks as the water is displaced. If you are using a big spacer between your tiles make sure you buy a wide joint grout

2. You may have filled the gap between the tiles but it is important to make sure the grout has filled the whole joint down to the background otherwise the grout is not supported, pockets of air below the grout can cause this cracking

3. Deflection or movement is the substrate surface, like wood which may be expanding or contracting with changing of temperatures, make sure the grout is flexible or has a polymer latex additive to stop this happening.

4. Tiles that have not been bonded correctly, failure in the adhesive will result in the grout moving, therefore, leaving the crack

5. Grouting before the adhesive has had time to fully cure. Some tub adhesives can take up to 4 days to fully cure, rapid set cement can be dry in as little as 3 hours.

6. The substrate the tiles are sticking to is not strengthened, any movement in the substrate will be transferred into the tile and grout lines.

By making sure all the above points are covered you will find there will be no more problems with grout cracking between your tiles.

Correct training on a good tiling course will ensure that all the above methods are used. UK Pro Tiling Training offer fast track professional tiling courses which cover all aspects of correct tiling methods
Visit www.tiling-courses.co.uk to find out more

Tiling A Swimming Pool

Tiling a swimming pool

It is common that tiles are used in the installation of bathrooms above baths and in showers which are called wet areas but a swimming pool is the ultimate wet area as the tiles will be submerged in water for long periods of time. It is important to get the job done correctly as future repairs are hard to do and can be costly to drain the pool and allow damaged surfaces to dry out.

When grouting the joints in a pool with a cement based grout which it is still hard to make a seal due to the cement being porous, even if an epoxy resin grout is used to fill the joint it cannot be guaranteed that the adhesive or substrate will be kept free from water if the epoxy did not perfectly fill the joint on installation.

Adhesives

Tile adhesives in the use of swimming pools must be such that water does not  effect the properties of the adhesive if the adhesive comes in contact with the  water. Cement adhesives must be used in this case

Waterproof Layer

The construction of the pool must have a waterproof shell or some kind of tanking system behind the tiles, just in case water seeps through the tile or joints.

Movements

There can be problems with movement due to the pool being tiled when empty, once tiling work is complete the pool will then be filled adding weight and pressures, even a change in the temperature of when the water goes in can cause cracks to the substrates.

Chemical Reactions

It is important to check the grout that you use as this can react with the chemicals such as chlorine, which will be added to the water, this could result in a colour change of the grout or a degrading of the grout.

Once the appropriate steps have been done above then tiling a swimming pool is just like tiling any wall or floor. If the swimming pool has a lot of contours then mosaic tile is best used as this kind of tile can follow the natural flow of the contour.

Tiling Courses

UK Pro Tiling Training offer fast track professional tiling courses which covernew-ukpro-side 
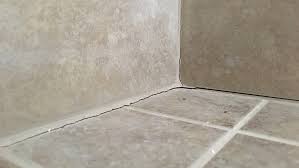
all the practical aspects of how to tile along with the background preparation information. For more details of our courses please visit www.tiling-courses.co.uk

Tiling Onto Plaster: How Long To Leave Plaster Before Tiling?

Tiling on New Plaster: How long to leave plaster before tiling?

Tiling onto plaster is relatively straightforward. When you place tiles directly onto plasterboard, this often means you don’t have to prepare or prime the plasterboard prior to doing it.

So long as you’re well prepared, tiling needn’t be difficult. Make sure you plan and measure carefully to prevent any mistakes. If the backing is strong enough to support the weight of tiles, tiling can be performed on numerous clean, even and dry surfaces.

If in doubt, as a professional but so long as you’re savvy when considering the weight of the tiles and the location of the tiling, you shouldn’t encounter any issues tiling straight onto plaster.

Capture

Planning is Key

The key to success? Preparation. If your wall has been plastered recently, make sure it has been left for at least 14 days before tiling on new plaster. If the plaster is old, ensure there aren’t any loose materials, cracks and hollows by tapping the plaster and listening out for any hollows.

It is also vital you repair any gaps with filler or even re-plaster a few parts where needed.

Tiling a wet room? Make sure you install a layer of cement board, so the area is completely waterproof and secure. If this isn’t necessary, a coating of sealing primer directly on the plaster will ensure a decent base, just make sure you give it 24 hours to dry. If you’re tiling a pattern, organised the layout prior to starting so no time is lost, and no mistakes are made.

It is important to plan when tiling onto plaster backgrounds to avoid small and problematic cuts which cause the tiling to look shoddy and slapdash as well as making it incredibly tricky to cut.

  • Work out how many tiles will fit in the chosen height of your tiling by using a tiling gauge baton
  • Figure out how high the first tile is
  • Fix the tiling gauge at this height and fasten the baton parallel, using a spirit level for precision
  • Locate the middle of the area that needs to be tiled
  • Avoid areas that may entail difficult cuts
  • Make a mark on the wall with your starting point

Tiling Onto Plaster Backgrounds images

Plaster is a weak material compared to brick and cement. When applying tile to a plastered surface it is important not to overload the weight of what the plaster will take before failure occurs, plaster will support about 20kg/m2 or about a 9mm thickness of ceramic tile.

Drying Times

New plaster work should be fully dried before tiling work is commenced, this drying time varies upon temperatures but can take up to 4 weeks before fully cured.

Plaster is not ideally the best surface especially in a bathroom as moisture and water can get in causing failure.

Reactions

When using a cement adhesive on your tiling projects you have to be careful images-2
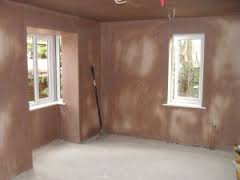
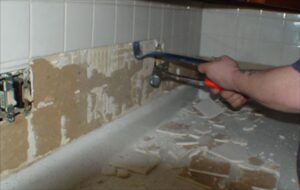
when tiling direct onto neat plaster. Gypsum plaster based products and cement products do not get on with each other and can cause de-bonding, this is due to the chemical reaction that goes on when the two come together. This reaction forms a weak layer of ettringite, which can cause the failure.

Prevention

To stop the ettringite reaction, plaster surfaces must be primed with a diluted acrylic primer or SBR, this primer acts like a barrier and stops the 2 products from contacting each other. PVA must not be used

Another problem when tiling on plaster is to be careful that the plaster has not been over troweled which results in a smooth shiny finish, this finish will have to be roughed up a bit with a wire brush prior to priming.

Tiling courses

Good quality tiling courses can give you a good understanding of how to tile and understand the backgrounds. UK Pro Tiling Training offer fast track courses teaching you all you need to know about tiling, for more information visit www.tiling-courses.co.uk