The tiles are perfectly flat and the grout had filled the joints with crisp lines. Now it’s time to add those fine details that will give the bathroom a luxurious feel.
 Right to the edge.
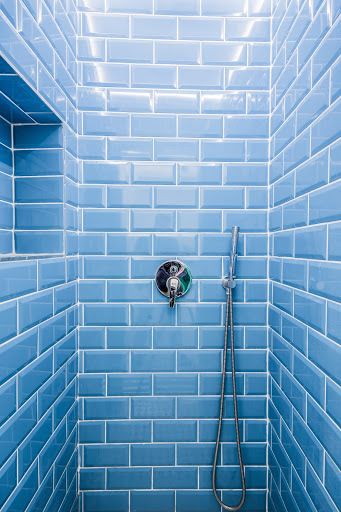
Tiling can be an underappreciated skill. And it really is a skill. A great tiling job can be spoiled by the edges being left unfinished. The tiler will be held in much higher esteem if the customer sees perfect lines and no bare tiles on the edge.
There are a variety of trims and edging details available.
Choosing a high quality, colour matched trim adds the professional finish to a tiling job.
 Choose from polished chrome, painted plastic or even bullnose tiles, which can all add that finishing touch.
Clean it once, clean it twice, clean it until it’s clean!
The biggest complaint about any tradesperson is the state they might leave someone’s home in. Never leave a tiling job until it is clean. Really clean.
Tiling can be a messy business. Adhesive and grout are both capable of ending up on tiles and every inch needs to be cleaned. Not just the tiles though, handles, taps, shower screens, in fact any surface which may come into contact with the tiler.
Grout should be cleaned as the job progresses. This will not remove all evidence, far from it, but it will make the clean up much easier. A second clean as the grout starts to go off will remove the bulk of the remaining residue.
The problem with leaving a customer’s house at this point is that once the tiles dry again, there is often a very fine dusty film left on the tiles. Agree to go back and polish all the tiles again and emphasise that the job isn’t quite finished.
Silicone can make or break the room.
With the tiles now spotless, it’s time to finish the job with silicone.
Make sure you choose a flexible, sanitary grade silicone. The key areas are between the walls and baths, shower trays, toilets and basins. The joint between a tiled floors and walls should be carefully finished too.
There are a variety of methods used to get a good silicone finish.
- The double. In deeper gaps, fill with one layer to ensure the joint is watertight. Once that is cured, go back over with a second, decorative layer.
- Mask it up. Particularly on obvious joints, using masking tape can ensure precise lines of silicone. Take your time with the tape, this is crucial to the finish. Apply a steady, even bead of silicone. The masking tape can be removed whilst the silicone is still wet. You should now be the proud owner of some seriously neat silicone joints.
- The wet finger on a steady hand. There are different choices here. Apply the silicone as neat as possible with a smooth consistent motion along the joint. Use a wet wipe style cloth to gently run along either side of the joint to remove the excess. Alternatively, dip your finger in a bowl of hot, soapy water to smooth the joint. Wipe your finger after each run on a soft damp cloth or wipe.
Handing a finished, fully tiled bathroom back to the customer is a proud moment.
Come to UK Pro Tiling for a variety of courses to top up all aspects of your tiling skills.