If you’ve recently completed one of our comprehensive tiling courses, you are, no doubt, ready to start earning as you impress your clients with your tiling skills.
You’ll need to make sure you’re tool bag is fully laden with the very best in tiling tools to get the job done professionally.
Gone are the DIY days of making do and mending!
We have put together the following guide to kitting yourself out.

Just make sure your tiling kit is not without:
- Manual Tile Cutter – the majority of tiles needing a cut can be trimmed to size using a manual cutter. With the advantages of needing no power, nor a particular workstation, manual tile cutters are ideal for moving around the tiling job with you.
- Electric Tile Cutter – perfect for fast and accurate cutting. Avoid cheaper DIY models which have neither the power, nor the quality of blade to tackle hard tiles. A good quality electric cutter will give a clean, precise cut every time.
- Drill And Drill Bits – many jobs will require tiles to be fitted over pipes, electrics and other obstacles. For the finished work to look the part, the holes drilled for these awkward spots should be true and clean. A drill with variable speeds and a top quality set of diamond drill bits should mean every job has that perfect finish.
- Electric Mixer – a hand held mixer, with variable torque settings, will ensure that your adhesive and grout are mixed consistently every time. Lumpy adhesive, with dry balls hidden in the mix will cause you issues when laying the tiles. The same applies to grout. If money is tight, an adaptor and a whisk bit could be attached to your existing electric drill.
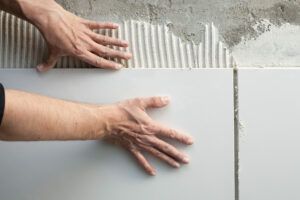
- Trowels – When laying adhesive to walls or floors, a smooth and consistent depth will lead to a smooth and consistent finish on the tiles themselves. To achieve this, selecting a tiling trowel which fits your hand perfectly is key. With the trowel comfortable in your hand, loaded up with adhesive, you should get that even distribution as the adhesive is spread onto the wall.

- Grouting Trowel – the grout is the icing on the cake of a tiling job. No matter how well you have laid the tiles, if the grout is poorly applied, that will be what draws the critic’s eye. As with your tiling trowels, get the weight and handle size which best fits you. Be sure to look into the smaller, different shaped trowels designed to get into those difficult to reach corners.
- Tile Spacers – it may seem obvious, but keeping a good supply of all sizes and types of tile spacers in your tool kit could avoid a frustrating interruption to work if you run out.
- Levelling System – there are a variety of levelling systems on the market, designed to remove all guesswork out of keeping everything perfectly smooth. A relatively small investment could mean your work’s standard will soon demand the reward to pay all that investment back.
- Tilers’ Lasers – for laying of of tiles, particularly on the floor, and for perfect levelling, a laser system could be a wise investment. Whilst not essential for a tiler, the time they save and the consistent accuracy could mean they will soon be earning their cost back for you.
- Buckets And Cloths – turn up to every job with a good supply of clean buckets, cloths and wipes so that you can keep the work area clean and tidy as you go. Scrambling around the floor looking for something to wipe up a spillage can be very annoying.
If you need training in any area of tiling, or just a refresher, be sure to get in touch with us here at UK Pro Tiling.