Year: 2016

Tiling A Swimming Pool

Tiling a swimming pool

It is common that tiles are used in the installation of bathrooms above baths and in showers which are called wet areas but a swimming pool is the ultimate wet area as the tiles will be submerged in water for long periods of time. It is important to get the job done correctly as future repairs are hard to do and can be costly to drain the pool and allow damaged surfaces to dry out.

When grouting the joints in a pool with a cement based grout which it is still hard to make a seal due to the cement being porous, even if an epoxy resin grout is used to fill the joint it cannot be guaranteed that the adhesive or substrate will be kept free from water if the epoxy did not perfectly fill the joint on installation.
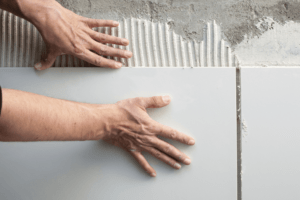
Adhesives

Tile adhesives in the use of swimming pools must be such that water does not  effect the properties of the adhesive if the adhesive comes in contact with the  water. Cement adhesives must be used in this case
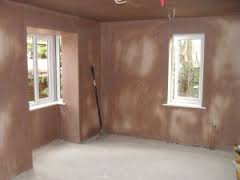
Waterproof Layer

The construction of the pool must have a waterproof shell or some kind of tanking system behind the tiles, just in case water seeps through the tile or joints.

Movements

There can be problems with movement due to the pool being tiled when empty, once tiling work is complete the pool will then be filled adding weight and pressures, even a change in the temperature of when the water goes in can cause cracks to the substrates.

Chemical Reactions

It is important to check the grout that you use as this can react with the chemicals such as chlorine, which will be added to the water, this could result in a colour change of the grout or a degrading of the grout.

Once the appropriate steps have been done above then tiling a swimming pool is just like tiling any wall or floor. If the swimming pool has a lot of contours then mosaic tile is best used as this kind of tile can follow the natural flow of the contour.

Tiling Courses

UK Pro Tiling Training offer fast track professional tiling courses which covernew-ukpro-side all the practical aspects of how to tile along with the background preparation information. For more details of our courses please visit www.tiling-courses.co.uk

Tiling Onto Plaster: How Long To Leave Plaster Before Tiling?

Tiling on New Plaster: How long to leave plaster before tiling?

Tiling onto plaster is relatively straightforward. When you place tiles directly onto plasterboard, this often means you don’t have to prepare or prime the plasterboard prior to doing it.

So long as you’re well prepared, tiling needn’t be difficult. Make sure you plan and measure carefully to prevent any mistakes. If the backing is strong enough to support the weight of tiles, tiling can be performed on numerous clean, even and dry surfaces.

If in doubt, as a professional but so long as you’re savvy when considering the weight of the tiles and the location of the tiling, you shouldn’t encounter any issues tiling straight onto plaster.

Capture

Planning is Key

The key to success? Preparation. If your wall has been plastered recently, make sure it has been left for at least 14 days before tiling on new plaster. If the plaster is old, ensure there aren’t any loose materials, cracks and hollows by tapping the plaster and listening out for any hollows.

It is also vital you repair any gaps with filler or even re-plaster a few parts where needed.

Tiling a wet room? Make sure you install a layer of cement board, so the area is completely waterproof and secure. If this isn’t necessary, a coating of sealing primer directly on the plaster will ensure a decent base, just make sure you give it 24 hours to dry. If you’re tiling a pattern, organised the layout prior to starting so no time is lost, and no mistakes are made.

It is important to plan when tiling onto plaster backgrounds to avoid small and problematic cuts which cause the tiling to look shoddy and slapdash as well as making it incredibly tricky to cut.

  • Work out how many tiles will fit in the chosen height of your tiling by using a tiling gauge baton
  • Figure out how high the first tile is
  • Fix the tiling gauge at this height and fasten the baton parallel, using a spirit level for precision
  • Locate the middle of the area that needs to be tiled
  • Avoid areas that may entail difficult cuts
  • Make a mark on the wall with your starting point

Tiling Onto Plaster Backgrounds images

Plaster is a weak material compared to brick and cement. When applying tile to a plastered surface it is important not to overload the weight of what the plaster will take before failure occurs, plaster will support about 20kg/m2 or about a 9mm thickness of ceramic tile.

Drying Times

New plaster work should be fully dried before tiling work is commenced, this drying time varies upon temperatures but can take up to 4 weeks before fully cured.

Plaster is not ideally the best surface especially in a bathroom as moisture and water can get in causing failure.

Reactions

When using a cement adhesive on your tiling projects you have to be careful images-2when tiling direct onto neat plaster. Gypsum plaster based products and cement products do not get on with each other and can cause de-bonding, this is due to the chemical reaction that goes on when the two come together. This reaction forms a weak layer of ettringite, which can cause the failure.

Prevention

To stop the ettringite reaction, plaster surfaces must be primed with a diluted acrylic primer or SBR, this primer acts like a barrier and stops the 2 products from contacting each other. PVA must not be used

Another problem when tiling on plaster is to be careful that the plaster has not been over troweled which results in a smooth shiny finish, this finish will have to be roughed up a bit with a wire brush prior to priming.

Tiling courses

Good quality tiling courses can give you a good understanding of how to tile and understand the backgrounds. UK Pro Tiling Training offer fast track courses teaching you all you need to know about tiling, for more information visit www.tiling-courses.co.uk

UK Pro Tiling Training Update

Update after UK Pro Tiling Training

IMG_5223
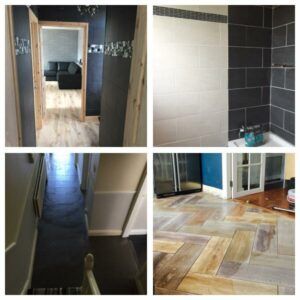
Thought I’d post an update on how things have been going since completing Darren’s course at UK Pro Tiling Training 4 months ago to maybe help anyone who’s thinking of changing career.
I’ve been a builder for the last 15 years and have done plenty of tiling jobs during this time but could never really call myself a tiler hence the reason for going on the course in the first place and finally learning how to do it properly.

The course was fantastic with everything needed to know about tiling taught in a very straight forward fast track way.
Once all the tiling skills had been taught, the first things we were advised to do was to get a website built as most tradesman don’t have one. Having a good marketing plan is crucial for getting the customers in as fast as possible and a website is a big part of this. So, the day after the course finished I found someone on recommendation and I now have my very own website Hampsteadtiling.co.uk, anyone looking for tiling work in the North London area, please feel free to check it out and contact me for an estimate. Below is a picture of my latest tiling work.

The next thing was to start getting some business in. I basically just walked into all of the well-known tiling shops in my area and simply asked if their customers ever needed a tiler. Not one manager said no and neither did they refuse to take my Business cards and set up a trade account for me.

Long story short, within 6 weeks of walking into that first shop I had a constant stream of work, which has never stopped and is constantly growing. It does also helps to “take care” of the managers that pass on the work!

Another thing I found is that it really doesn’t take long for other tradesmen to notice your work if done well. As I mentioned earlier, I had done a lot of tiling prior to the course but never got anywhere near the type of praise coming from the other trades as I do now.

Those same guys are now recommending me to their own customers and good quality work/customers have subsequently followed.20160518_170256 (1)

The long and short of everything that has happened so far after completing Darren’s course is that I now “feel” like and can talk like a Tiler as opposed to just acting like one which comes across to everyone I speak with.

Tiling Courses

So for anyone who’s thinking about doing the UK Pro Tiling Training course for whatever reason, whether it’s a career change or just learning how to tile the right way, I highly recommend Darren and his team to get you where you want to go in the absolute shortest possible time absolutely everything is covered on the course from how to tile to how to run a business.
Thanks
GaborӬ; Hampstead Tiling (North London)

Contact
Anyone interested in learning to tile or a career change, please visit UK Pro Tiling Training

Testimonial Neil Conroy

UK Pro Tiling Training

Testimonial; Neil Conroy

IMG_5247

Hi Darren and Tracey,

Thank You

Firstly I just wanted to say a massive thank you not only for the quality of the tiling course I attended but the support I’ve received since completion of the course and secondly to give you an update on myself and the my business ”¨Diamond Tiling Services North East.

Since leaving the course in February I went back to my job in the Middle East and instantly got to work on my marketing strategy.

I returned home on the 1st of April and instantly had 6 weeks worth of work booked in.

The nerves soon kicked in and I started questioning my self. 13237724_990835347674922_1542110853341958875_n-2
– Am I capable of doing this without instruction?
– How much did I actually learn on the 9 day and did I actually take it all in?

Well after my first job the nerves went and I soon realized Darren had given me all the skills I needed to complete even the most complex jobs.

I am now booked up for the next 12 weeks and have great reviews from customers who are really pleased with the quality of my work.
Once again thanks to you both.

Above are some of the tiling jobs I’ve completed recently.

Best Regards
Neil

Tiling Courses;

Anyone thinking of a change of career like Neil then visit UK Pro Tiling Training to find out more

How to Apply Tiles to a Wall and Floor

Fixing Wall and Floor TilesIMG_5247

Applying Adhesive to walls

It is important to trowel at an angle of 45 degrees and slightly reduce the angle going up the wall, this way the adhesive will stay in contact with the wall and not run out after a few inches.

Applying adhesive to a floor

When applying adhesive on the floor, put a large pile of cement adhesive on the floor and keep the angle at a constant 45 degrees.
In both cases make sure you are left with a rib of adhesive that is full and not broken up, also make sure you scrape the surface enough to remove adhesive between the ribs so you can see the surface in between the ribs

How to get tiles on the wall.

Placing tiles on the wall should be quite an easy process if you follow the below instruction.

Put your adhesive on the wall and place your first tile on top of your level batten and move lightly in a diagonal motion about 3-4 mm away then move back, do not press hard.
Place your second tile touching the first tile then move out 3-4 mm then back until it is 2 mm from the first tile and place spacers in.
Place your third tile on top of the first tile touching then move out 2-3 mm diagonally then move back 2 mm from the first tile and place spacers in
Place your 4th tile touching both sides oIMG_5187
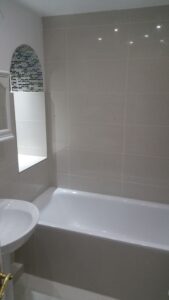
f 2nd and 3rd tile, move away diagonally and put a 2mm cross spacer flat in the joint and make sure it sits below the surface, then move the 4th tile back into position

How to get tiles on the floor

You should now have 4 tiles in a square block which are clean and perfectly spaced.
Just keep tiling in this sequence until you have completed the whole area to be tiled

Tiling Courses

Good quality tiling courses such as UK Pro Tiling Training give a full understanding of how to tile walls and floors correctly, working from your own bathroom simulated unit you will be fitting tiles and shaping tile around many commonly found objects in the bathroom

For more information on courses visit UK Pro Tiling Training

Tiling On A Floating Floor

Tiling on a floating floor

A floating floor is a floor that is not a floating attached to a timber joist framework. It is usually a chipboard or moisture resistant board that is tongue and grooved and just lies on top of an acoustic material such as a polystyrene block. Due to the floor boards not being fixed they produce a lot of movement and therefore tiling on this surface need extra attention otherwise failure of the tiles will occur.

Deflection

The biggest problem here when tiling on a floating floor is that the floor will be moving up and down, this is called deflection, a slight spring or bounce can be felt as you walk upon this type of floor.

Lateral movement.

As well as deflection the floor can expand and contract due to the wood surface heating and cooling, this also causes a problem in tiles which causes uncoupling of the tiles resulting in failure.

Flexible Adhesive

Although flexible adhesives and grouts must be used to counteract the movement it is not enough to stop the tiles from coming loose and failing.

Preparation

To stabilise the floating floor, the tongue and groove floor must be strengthened, the use of cement tile backer boards are a good option here, No More Ply or Hardi Backer board is an overlay board that will do the job well.

NO More Ply cement boardimages-300x168

  1. To install the No More Ply tile cement board,
  2. First clean the floor
  3. Apply a bead of Mega Strength glue to the back of the board
  4. Fix the board to the floor leaving a 2mm joint between each board
  5. Screw 8 self-drilling 25mm screws into the board securing it to the floor
  6. Prime the No More Ply
  7. Tile with flexible tile adhesive and grouts using at least a 12 mm floor trowel creating a 6mm adhesive bed

The cement particle board is a better choice than plywood overlays due to the cement board having no expansion or contraction properties.

A good tiling course will cover all the installation and preparation guides to using tile backer boards.

Uk Pro Tiling Training is a dedicated purpose-built tiling training centre which companies and anybody wishing to retrain as a wall and floor tiler

Please visit www.tiling-courses.co.uk for more information.

Types Of Trowels In Tiling

How Tiling Trowels Work

If you’re undertaking a new tiling project, then it’s essential that you choose the correct trowel for the size of tile that you’re using it’s one of the most important tiling tools you’ll need on a job.

In the same way as masonry trowels, tile trowels feature handles and flat metal plates, designed for scooping up and pasting mortar onto smooth surfaces. Trowels feature notches, which do two vital things.images-2

Tile Sizes

Tiles come in varied sizes these days, from very small to extremely large and, therefore, getting the right amount of adhesive on the back is essential to make the tiles stick to the wall or floor.

The smallest tiles are mosaic tiles, which are usually about 1-inch square and come on a sheet covering approximately 12 x 12-inch squares or 300 x 300mm.

The largest tiles can be up to 1.2 metres long or 1200mm x 600mm wide, so which notched trowel do you use where? Well, as a rule of thumb, the larger the tile, the larger the notched trowel you would use to fix them.

Tiling Trowel Sizes

There are different trowel sizes available, including:

  • 3mm square notch
  • 6 mm Square notch
  • 8 mm square notch
  • 10mm square notch
  • 12 mm square notch
  • 20mm square notch

The Types of Trowels Explained

3 mm tile trowels are often used for fixing mosaic tiles as this produces a very thin bed of adhesive which means there’s less chance of the adhesive coming through the tiles when fixing.

After that, the mm size of the notch roughly equates to the inches of tile beingimages-3 fitted plus another 2 inches. For example, 6mm notch = 6-8 inch tile, 8mm notch = 8-10 inch tile, 10mm notch = 10 -12 inch tile, and so on. A 12mm notch would be used for any tile over 12 inches.

This is a general rule and things can change due to the flatness of the surface you’re tiling onto so this information is for general guidance only. If the surface isn’t flat, then you can increase the notch to the next size to what would be generally used.

For floor tiling, a minimum of 10mm trowels would be used to ensure there’s enough contact on the back of the tile to make sure there are no voids.

When trowelling your adhesive onto walls and floors, make sure you trowel at an angle of 45 degrees and press hard scraping the wall or floor only to leave the notch of adhesive.

When placing a tile, move it out 5mm then back to make sure your adhesive gets a good contact with the tile.

Tiling Courses

Decent quality tiling courses can show you the correct methods of tile application. UK Pro Tiling Training offers fast track professional tiling courses which give you the correct methods of application and the background knowledge to do the job correctly. For more information visit www.tiling-courses.co.uk

Using Silicone Sealants, No mess, Best Tip Ever

Are you one of the many who gets silicone sealants all over your job, are your hands stuck together with the stuff after you have used it? then try these tips below.

Preparation

Make sure where you are going to put the silicone is completely dry, for example, the joints at the bottom of your shower where the tile meets the tray or around the base of a toilet etc.

Unscrew the nozzle and cut off the end of the tube and then replace the nozzle, cut the nozzle tip at a 45-degree angle.

Application
Squeeze the end of the trigger in your sealant gun until the silicone comes out running a smooth weld like joint of silicone along where you want the silicone to go, once you come to the end and want to stop, press the flat thumb trigger on the gun, this will stop the pressure in the spring and stop any excess silicone pumping out. Make sure there are no gaps where you have made the welded silicone joint if you have just put a little bit more silicon in there to fill it up.

Heres the trick

Most people just run their finger across the joint now resulting in the silicone getting everywhere. What you need to do is get a plant water spray bottle and add a small amount of washing up liquid to some water to make a soapy solution.

Spray the soapy solution where you have put the silicone to make it wet, make sure the spray is fine and at a wide-angle, once you have done this use a profile tool also sprayed wet with the soapy solution and pull the profile tool back across the weld silicone joint, you can use a soapy finger for this also.

You will find this leaves a perfect joint with nothing anywhere but the sealed joint, your profile tool or finger will clean up no problem as the silicone will not stick to it.

Happy siliconing, more tips from UK Pro Tiling training coming soon, fast track pro tiling courses

Looking For Good Tiling Courses

There are many providers which will promise to deliver good training, but what do you really need to know when thinking of retraining as a wall and floor tiler.

Tiling courses come in a range of lengths from 1-week short fast track courses up to 2 years part-time at a local college, so which one do you pick?

Well, this can depend on your age or financial circumstances.

How old are you?
If you are young person and looking for an apprenticeship then the college route would be the best option alongside work experience with a wall and floor tiler, this route can take up to 4 years to complete, you will be a general labourer to the tiler doing all the labour work to start with, it will be a year or so before you will be allowed to try any tiling practices for yourself.

If you are older with a family or have financial commitments, then the college route might be too long and slow so you may be looking for fast track tiling courses that can get you up to speed quickly therefore once you have learned and practised the art of tiling, you will be able to start a business and trade straight away and start receiving an income from it.

College courses can be slow-paced but a good quality fast track tiling course can get you straight into physical practice and an understanding of what is required to do the job correctly.

When looking for a training provider it is important to also know if the provider will teach you about running a tiling business as well, having the tiling skills and leaving the training centre equipped with your new-found knowledge and new tools is no good if you don’t know how to start your business quickly and start earning. A good training centre will have an instructor that has been self-employed as a tiler before who can pass on his self-employed business experience as well.

The Training Centre
All training centres and colleges are artificial places so you have to make sure that the tiling training bays are as true to life as possible, the training centre should also offer theory sessions along with the practical side of tiling, most people want to get hands-on and stuck in with the practical fitting of tile which is fine but learning the different products and background preparations are essential for the correct installations reducing the chances of tile failure.

A keen eye is required from any person thinking of becoming a tiler as there is a fine line between a good looking installation and a bad one, millimetre precision is required for every tile joint, this will be taught on your course and is quite easy to acquire this attention to detail with the help of tile spacers.

The Skills Needed.
Once you have the practical tiling skills sorted, then you need to learn how to market and advertise your new
business, if you don’t find any customers then you won’t be tiling.

The sales skills are the next skill you need to acquire because once you have found your customers you need to sell them your service.

Interpersonal skills is another good one to have, befriending your potential customer usually results in you getting the job.

What a good training centre should offer.

Here is a list of what a good tiling training provider should cover on their tiling courses.

  • Qualified NVQ level 3 tutors
  • At least 2 years of history teaching tiling
  • Lots of positive feedback and testimonials from past learners
  • Tutors that have run their own tiling business
  • Business advice
  • Practical as well as theory sessions
  • Proven training programs that work
  • Course hand out notes detailing background preparations and product knowledge
  • Aftercare service for ongoing support
  • Good quality training facilities with up to date tools
  • The use of new tiles, not tiles that are reused.

Talking to a provider

If these questions above are asked when talking to a potential training provider then you will get more understanding of what to expect on a course and you can then make your mind up if they are good or not. Good quality fast track tiling courses usually cost around £500 for a weeks intensive training which is why it is important to pick the correct provider. Many people have started a tiling business with as little as two weeks training and then went on to build a good solid profitable business.

One to look for and consider is UK Pro tiling training who are one of the longest-running tiling centres in the UK with good facilities and an excellent track record having trained thousands of past learners on their fast track tiling courses.

Shortage Of Construction Workers

Shortage of construction workers in the UK

The solution to the UKs housing shortage could be delayed due to a severe lack of tradesman currently working in the UK.

Skilled tradesman in the construction trade are now some of the most sort after professional people in the country, this is resulting in some tradesman’s wages matching that of doctors and lawyers.

New builds are struggling to keep up with demand due to the shortage and this intern could have a big impact on the UKs economic growth.

Large companies such as Balfour Beatty who have been involved in large projects such as the Olympic stadium said the construction sector is struggling due to the lack of skilled labour such as bricklayers, joiner, plasterers and tilers.

Maxine Wheldon, HR director of the company’s major projects business, said: “The demand for skilled labour within the infrastructure sector is at an unprecedented level and this is forecast to rise with major programs on the horizon, such as strategic roads investment, HS2, Crossrail 2 and new nuclear projects.”

“The UK labour market is overheated and the main contractors are fishing in a limited pool for highly skilled resource, which often has a consequence of inflating salaries for scarce skills.”

The Home Builders Federation has stated that training people in the building trades was now the biggest single issue that the construction industry faces.

House builders across the UK have already recruited many thousands of new apprentices and are looking to attract anyone with skills that could be transferable from other industries or military backgrounds.

To plug the shortage short term, tradesman have been recruited from abroad, long term goals are to get a strong UK tradesman workforce, this can come from private training center’s retraining anyone that is interested in becoming a self employed tradesman.

UK Pro Tiling Training is one of the many successful training Centre’s across the country who are doing fast track self employed wall and floor tiling courses.

Centre director Darren Yorke has said “ there has never been a better time to learn a new trade, with the skills shortage wages are high and there is plenty of work out there whether that be on a building site or on private domestic dwellings, our fast track tiling courses can show you all the required skills needed for you to make a start in the industry.”